
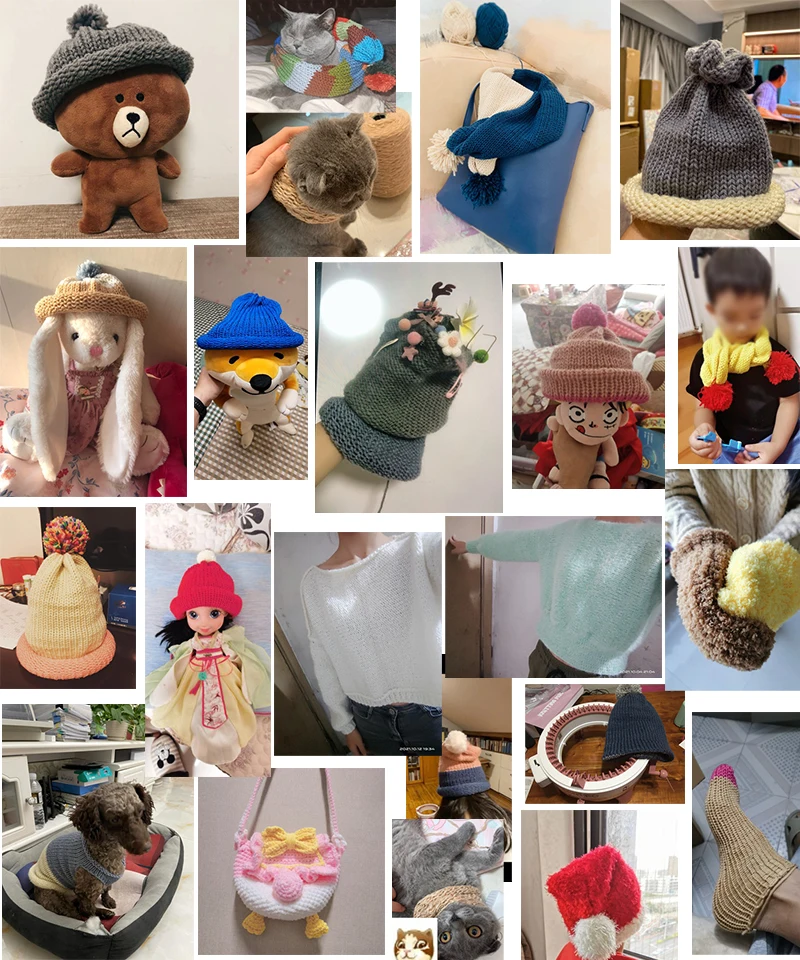
DIY Wool Knitting Machines- 22 Needles
Art+Leisure


Couldn't load pickup availability
22/40/48 Needle Handmade Wool Knitting Machine
IDEAL DIY GIFTS FOR KIDS:
Perfect for beginner knitters like kids, knit fashion accessories like hats scarves socks and leg warmers, as a gift to Children, family and friends

FAST KNITTING MACHINE:
The weaving speed is ten times faster than the traditional hand knitting method. Hand-knit a hat for about 30 hours. A woven machine is used to woven a hat for about 15 minutes. Compact body, easy to carry and use, the weaving effect is good


48 needles with line counter to display the number of knitting lines

This manual knitting machine has a dual mode to meet a variety of needs.

T loop knit, after the first turn to a tooth leak, start a clockwise rotation to woven a cylindrical fabric, can be used as a hat after finishing.

P flat knit, you can adjust the width of the fabric according to your needs, and use the needle and crochet to freely splicing into a scarf, etc

Teaching of the first loop of the knitting machine
The first loop stitch operation: 1 needs to pass through the inside of the white crochet hook first, the second stitch passes through the back of the crochet hook, and the third stitch passes through the inside of the crochet hook. (one stitch on the inside) (one stitch on the back) cycle operation one Lap, the first lap is completed
The second lap does not need (one stitch on the inner side) (one stitch on the back), just roll normally.

Steps to install the base: with anti-skid pad


Looseness of braided yarn
You will need to adjust the position of the thread hole that goes through the thread tensioner according to the thickness of the yarn you are using. Thick yarn is recommended to go through the loosest thread hole on the outside.
Tightness: Tight / Tightness: Moderate / Tightness: Loose / Tightness: Tightest (for very fine soft wool)


48 needle knitting machine size display
22 needle knitting machine (inner diameter is about ≈10cm/3.94inch)
40-needle knitting machine (inner diameter is about ≈22cm/8.66inch)
48-needle knitting machine (inner diameter is about ≈26cm/10.24inch)

EDUCATIONAL TOY:
The knitting toy is made of high quality plastic material, durable and long service life. Good for children developing creativity, DIY ability, elaborative faculty.Recommended for ages 6 and up.

Tutorial manual

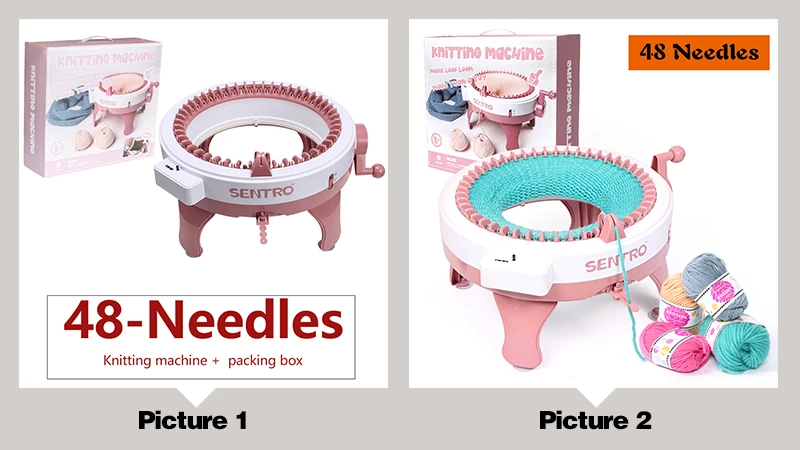
48 Needles-Knitting Machine Package included as below:
1 x 48 Needles Knitting Machine
2 x Plastic Sewing Needle
1 x Crochet Hook
2 x Large rolls of yarns (Random colors delivery) Need to choose belt yarn
2 x Small rolls of yarns (Random colors delivery) Need to choose belt yarn
1 x Screwdriver
1 x English Instruction Manual
48 needle knitting machine is suitable
1. Knitted gloves, socks, scarves, dolls, bags, pumpkins, flowers,
Sweaters, pillows, etc. (adult hats can be knitted)
2. With a line counter to display the number of knitting lines
3.48 needles with line counter to display the number of knitting lines
48 needle knitting machine (inner diameter is about ≈26cm/10.24inch)
Note:(48-needle knitting machine suit selection) uit with yarns-suit without yarn
Select picture 1: 48 needle knitting machine + packing box(suit without yarn)
Select Picture 2: 48 Needle Knitting Machine + Box + Yarn(uit with yarns)

40 Needles - Knitting Machine +Packing Box, Package included as below:
1 x 40 Needles Knitting Machine
3 x Plastic Sewing Needle
1 x Crochet Hook
1 x Screwdriver
1 x English Instruction Manual
1 x Packing Box
40-needle knitting machine is suitable
1. Knitted gloves, socks, scarves, dolls, small bags, pumpkins, flowers,
Sweaters, pillows, etc. (children's hats can be knitted)
40 needle knitting machine (inner diameter is about ≈22cm/8.66inch)

22 Needles - Package included:
1 x 22 Needles Knitting Machine
2 x bundles of yarns (Random colors delivery)
1 x English Instruction Manual
1 x Crochet
1 x Short Needle
1 x Packing Box
22 needle knitting machine is suitable:
1. Knitted gloves, socks, scarves, dolls, bags, pumpkins, flowers, etc.
2. Note: This style is not suitable for weaving hats
22 needle knitting machine (inner diameter is about ≈10cm/3.94inch)

22 Needles - Package included:(inner diameter is about ≈10cm)
1 x 22 Needles Knitting Machine
1 x Plastic Sewing Needle
1 x Crochet Hook
2 x bundles of yarns (Random colors delivery)
1 x English Instruction Manual
1 x Packing Box

22 Needles - Package included:(inner diameter is about ≈10cm)
1 x 22 Needles Knitting Machine with Row Counter
1 x Plastic Sewing Needle
1 x Crochet Hook
2 x bundles of yarns (Random colors delivery)
1 x English Instruction Manual
1 x Packing Box

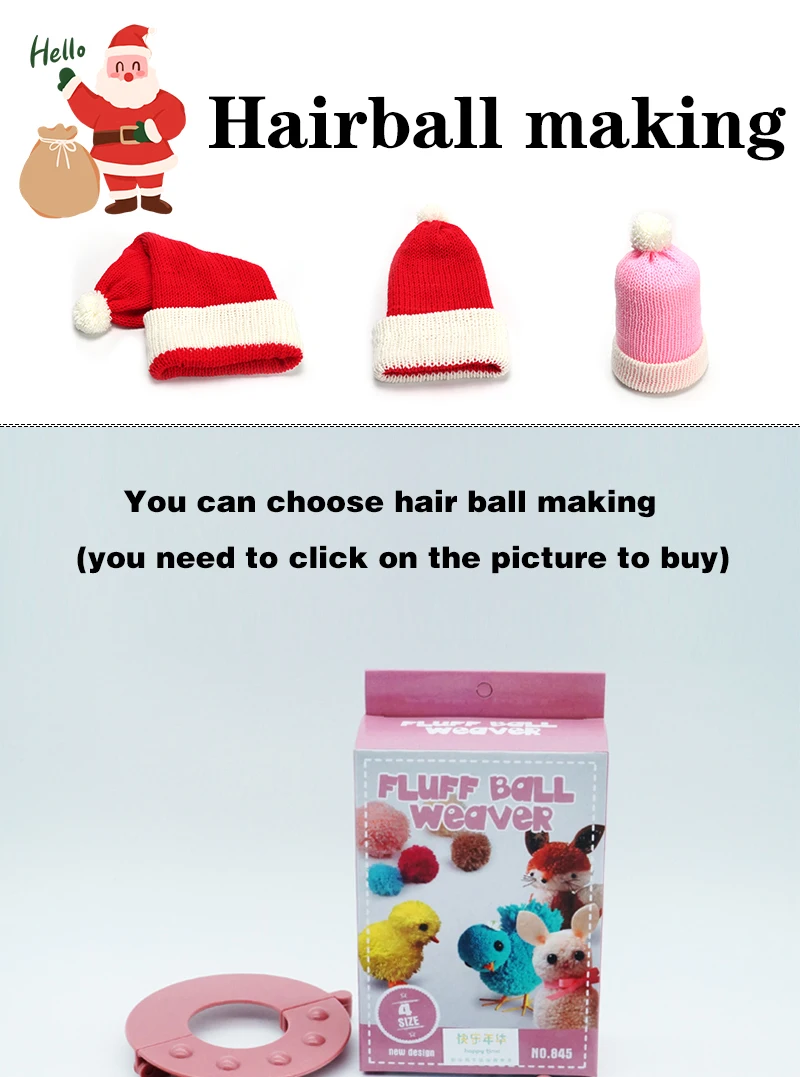
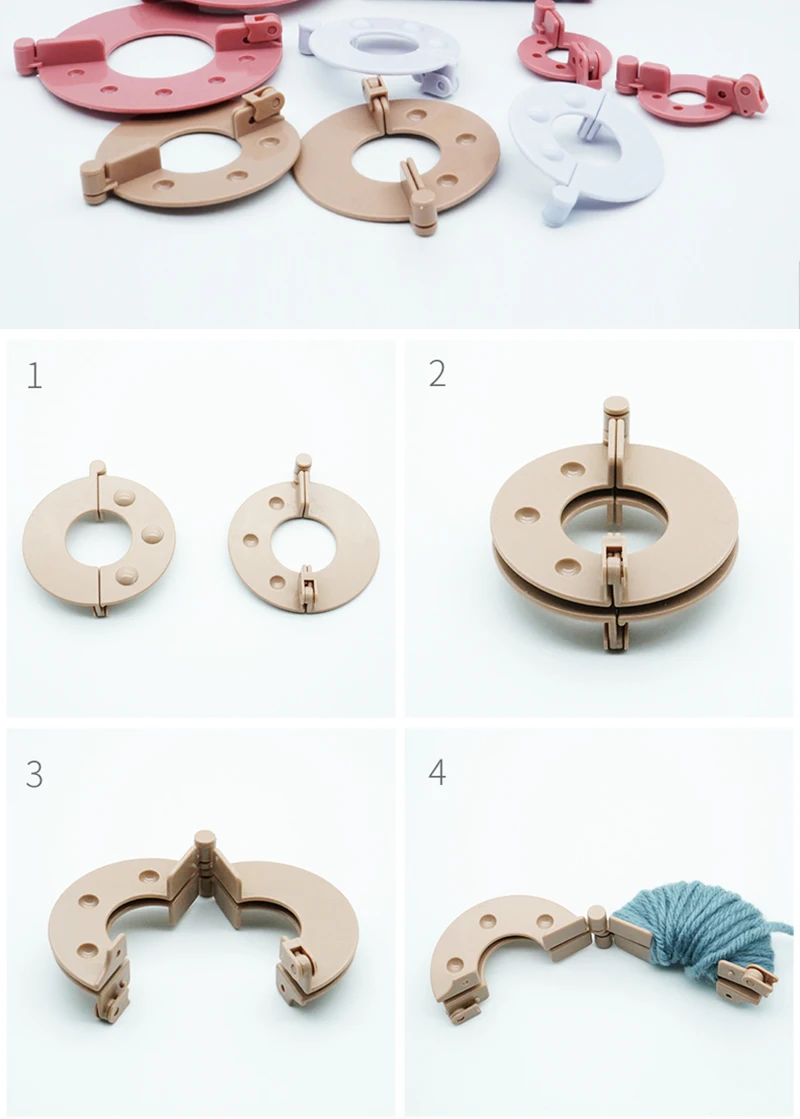
Hairball making
Click on the picture to buy


Hand Knitting Machine Operation Manual
Figure 1
1-Inlet
2 - Crochet (48 crochets total)
3-Handle
4- Odometer
6-↑Up: Flat Sheet Weave
↓ Down: Ring/Tubular Braid
5- Elastic controller

Small paste before weaving:
Ring/tubular braid:
Step 1: Tubular or Flat
Step 2: Choose the Right Yarn
Step 3: Thread on the Machine

Step 4: Set the Yarn Tightness
1. Pass the yarn through the wire port and put it into the groove to ensure that the yarn is in the process of entering the machine
not off-line (as shown in Figure 2 and Figure 3);
2. Place the tension controller in a position that can move upward (as shown in Figure 3), so that the yarn passes through
After tightening the thread guide, it will sag naturally. Keep in mind that you will need to
to adjust the position of the thread hole through the thread tensioner. Thick and heavy wool is recommended to pass through the outside
The loosest wire hole (as shown in Figure 4).

tightness: tight/Tightness: Moderate/tightness: loose/Tightness: Tightest(for very fine soft wool)
Step 5: Start Weaving
1. After hanging the white needle again, slowly shake the handle to start knitting. In the first three to four states
In the knitting, be very small to ensure that no stitches fall. Because of the initial circle effect
is to lay the foundation for the success of the entire work;
2. Hold the machine with your left hand to keep it stable, and use your right hand to shake the handle clockwise.
Weaving (as shown in Figure 2);
3. Pay attention to observe whether there is enough loose yarn to supply the knitting work of the machine at any time.
Gently loosen the yarn periodically to enter the machine from the bottom up to avoid needle drop;
4. When the woven part of the work gradually becomes longer, please unfold it carefully and stretch it down.
Once this section is longer than the machine, you have to unroll it without interruption and go down the middle
Pull out to keep it running smoothly.
Step 6: Loop Weave Finishing and Off-Machine Steps
1. When the knitted work reaches the desired length, when the white crochet needle moves to the right of the wire opening,
Please stop shaking the handle. Special Note: The yarn must still remain in the crochet hook of the machine
until the fourth step of this off-camera process;
2. Take 45-60 cm long yarn and cut it (as shown in Figure 6). This is as your weave
For the ending of the work. Pass the yarn through the thread hole and the groove of the thread opening in the slack controller
Take it out and thread it through a plastic sewing needle. Then pull the yarn vertically (as shown in Figure 5),
Shake the handle to idle the machine one revolution without yarn:
3. While you are shaking the handle slowly, use the plastic sewing needle with the yarn threaded in order from front to back
Pass through the thread sleeve that the crochet hook has dropped (as shown in Figure 7 a.b). You must complete a full circle of threading,
Make sure that each thread sleeve is threaded through the plastic sewing needle to the remaining yarn;
4. Shake the handle clockwise to make all the thread sleeves disengage from the crochet needles on the machine during the threading process;
5. At this point, your work has been finished and left the machine;
6. In order to achieve a better edge effect, you can use a loop needle to pass through the last loop of the wire sleeve.
Use the ending thread as the stitching yarn, use the stitches you used to sew items, according to your own
Creative edge stitching can be done;
7. For tubular finishing (such as scarves, leg warm socks, etc.), use a sewing needle with thread
Make back stitches in the last few sleeves (shown in Figure 8b), and tie a knot at the tail.
8. If you need to make a gathered loop finish (such as hats, wallets, etc.), pull the loose yarn
the tail, pulling it tight until the mouth of the cylinder is tight. Thread and knot the plastic sewing needle a few more times.
Once you have your mouth closed, you can also add accessories like hair balls to the knots at the top of the piece.

Change yarn color or wire operation-joint:
Knot the new yarn with the old yarn and make sure it doesn't slip. Cut off the excess thread,
Take the yarn out of the wire port and the tension controller first (otherwise the knot won't pass smoothly
thread guide and thread hole for slack controller). Tighten the yarn manually first, shake the handle until just
The knotted part goes into the machine crochet, and the yarn is placed into the thread guide and slack controller
in the wire hole. Keep rocking the handle slowly, and then gradually return to the normal knitting step.
Flat Sheet Weave:
Slide the mode switch button on the front of the fuselage to the upper position.
[See step 3 scan the code to watch the video: How to start knitting? ]
Reminder: If you often have edge needle drop phenomenon during the flat sheet knitting process,
Please confirm if you have shaken the handle of the machine until it stops completely,
Change the direction again.
How to make up a dropped needle:
1. During the operation of the machine, it is easy to accidentally drop the needle when you do not notice it. once
When this happens, you can use the matching small crochet hook to make up the needle;
2. When the needle is found to be dropped, continue to shake the handle to knit to the previous hook of the dropped needle.
Stop when the thread is inserted, and note that the hook where the needle is dropped is just next to the thread entry port.
The needle hook at the needle drop position is just raised;
3. You will see a dropped thread sleeve at the place where the needle is dropped. The position f where the sleeve slips off
In the shape of a ladder, it looks like a braided part connecting the two sides;
4. Extend the small crochet needle from front to back into the thread sleeve of the needle drop;
5. Use a small crochet hook to hook up the first thread in the "ladder" and pull it up through the loose
Thread sleeve, at this time, the thread sleeve formed by the thread just passed through shall prevail, and hook up the "ladder".
Another thread, pull up through the thread sleeve. And so on, in turn repair the needle drop until it can be
Hook the thread sleeve back to the crochet hook on the machine as far;
6. Hang the yarn sleeve hooked on the small crochet needle in the handle back to the crochet needle of the machine.
"48 needle knitting machine" suction cup fixing instructions
1. Items included in the accessories package:
Tripod*4,
Suction cup*4,
Screw*4,
Screwdriver* 1.
2. Insert the tripod into the groove at the bottom of the machine, and tighten the screw with a screwdriver.
3. Put the suction cup into the notch at the bottom of the tripod.
4. Done. This device will reduce the amount of machine movement during operation.

Noted:
1.The fabric is manually cut, the 1-2 cm error which is within the normal range.,thank you.
2.Our products are taken in kind. Due to the different resolutions of the display, there may be a certain color difference between the actual object and the picture. Please take the actual object as the standard.
- Share your shipping policy
- Share your packaging details


INCLUDE A MESSAGE ABOUT YOUR SHIPPING POLICY